Recently, I created a detailed Spring MVC tutorial for my students at the Software University (SoftUni), as part of their training course “Software Technologies”, so I want to share it with anyone interested to learn how to integrate Java, Spring Framework, Spring MVC, Spring Boot, Spring services, repositories, controllers, models, Thymeleaf views, Spring form validation, JPA, entity classes, Spring Data, Spring Data JPA, Hibernate, JPQL, MySQL, HTML, CSS, JavaScript and jQuery into a single working project – a server-side Web application for simple blogging.
In this tutorial we shall create a fully-functional Blog system from scratch using Spring MVC and MySQL database. The blog holds posts (visible for everyone). Registered users (after login) can create / edit / delete posts. The blog will use Java, Spring Framework, Spring MVC, Thymeleaf template engine, Spring Data JPA, JPA, Hibernate and MySQL.
First, download the project resources (images, JS code, database sample data, etc.): Spring-MVC-Blog-resources.zip.
What We Are Building?
We are building a Blog system where users can view posts and create / edit / delete
posts after registration / login.
Blog System – Project Specification
Design and implement a “Blog” Web application in Spring MVC + MySQL. Implement the following functionality:
Blog System – Screenshots
![]()
![]()
![]()
![]()
![]()
![]()
![]()
![]()
Part I: Setup a Spring Boot Project
In this section we shall create an empty Spring MVC application based on Spring Boot using Maven.
We shall use IntelliJ IDEA as development environment, but Eclipse or any other Java IDE could work as well.
Create a New Maven Project
Create a new Maven project for the Blog system:
![]()
![]()
![]()
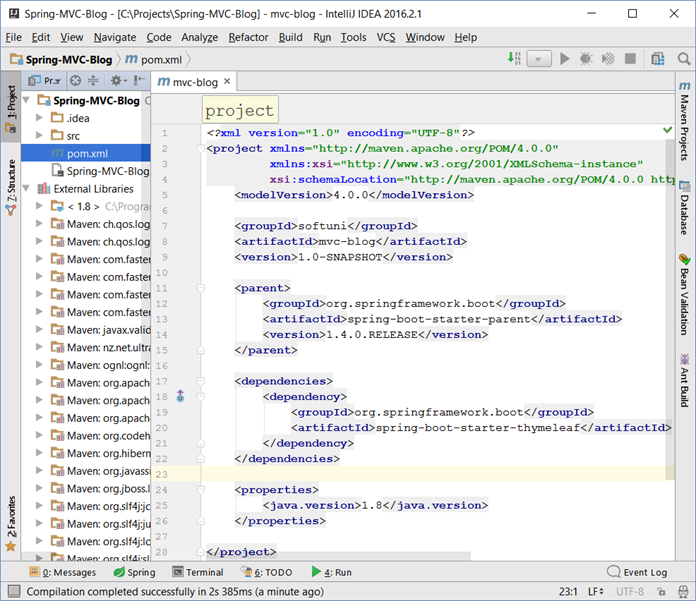
The IDE will create for you а Maven configuration file pom.xml in the project root folder. In IntelliJ IDEA enable the “auto-import” for the Maven dependencies.
![]()
Add the Spring Boot Dependencies in Maven
Inside the <project> element in the pom.xml add the spring-boot-starter-parent dependency:
|
pom.xml
|
|
<parent>
<groupId>org.springframework.boot</groupId>
<artifactId>spring-boot-starter-parent</artifactId>
<version>1.4.0.RELEASE</version>
</parent>
|
The above declaration inherits all Spring Boot libraries and project settings from spring-boot-starter-parent. We will assign the Spring Framework version only once at this place. We shall use version 1.4.0 – the latest stable release as of August 2016. All other Maven dependencies will be without an explicitly specified version, so Maven will detect the required version automatically.
Add also a dependency to spring-boot-starter-thymeleaf:
|
pom.xml
|
<dependencies>
  <dependency>
    <groupId>org.springframework.boot</groupId>
    <artifactId>spring-boot-starter-thymeleaf</artifactId>
  </dependency>
</dependencies>
|
The above code will configure the Thymeleaf templating engine that will be used for the views
Set the Java version to 1.8. Otherwise the project will use old Java version and some functionality will not compile:
|
pom.xml
|
<properties>
  <java.version>1.8</java.version>
</properties>
|
This is how your Maven configuration file pom.xml might look like. Note that if everything is OK, the project libraries will include all Spring Core, Spring Boot, Spring MVC and Thymeleaf libraries (jar files, shown on the left):
![]()
Create the Project Structure: Directories
Create a package “blog” in the source code root of your Java project: src/main/java:
![]()
Create the following packages (directories) in src/main/java/blog:
- models – will hold the project MVC models (entity classes) like User and Post.
- controllers – will hold the project MVC controllers that will serve the blog functionality.
- services – will hold the business logic of the project, invoked by the controllers.
Create the following folders in src/main/resources:
- templates – will hold the application views (the Thymeleaf HTML templates and template fragments).
- public – will hold static HTML content like CSS, images and JavaScript code.
- public/img – will hold the site images (e.g. site logo).
- public/css – will hold the site CSS styles.
- public/js – will hold the site JavaScript files (e.g. jQuery, Bootstrap and custom JS code).
Your project directory structure should look like this:
![]()
Create the Project Structure: Files
Create a few important project
files in src/main/resources:
- public/css/styles.css – the main CSS styles for the application. You shall put some style in this file later, so leave it empty now.
- public/img/site-logo.png – the site logo. Copy it from the resources coming with this tutorial.
- public/img/favico.ico – the browser icon for the site. Copy it from the resources for this tutorial.
- public/js/blog-scripts.js – the JavaScript code that will be used in our blog. You shall put some JS code in this file later, so leave it empty now.
- public/js/jquery-3.1.0.min.js – the jQuery library that will simplify your JS code. Copy it from the resources for this tutorial or from Internet: https://jquery.com/download/.
- application.properties – the Spring application settings (like logging configuration and database connection settings). Initially, leave this file empty.
After completing all the above steps, your project resources file structure should look like this:
![]()
Create the Spring Boot Application Startup Class
Create the Spring Boot application startup class in the package “blog” in your src/main/java directory:
|
src/main/java/blog/BlogMvcApplication.java
|
package blog;

import org.springframework.boot.SpringApplication;
import org.springframework.boot.autoconfigure.SpringBootApplication;

@SpringBootApplication
public class BlogMvcApplication {
    public static void main(String[] args) {
        SpringApplication.run(BlogMvcApplication.class, args);
    }
}
|
This class configures and starts your Spring Boot application, which is still empty. The @SpringBootApplication annotation applies the default configuration settings for our Spring Boot application (finds and loads all entities, controllers, UI templates and other application assets). Calling SpringApplication.run(…) will start an embedded Tomcat Web application server at http://localhost:8080 to serve the HTTP requests to your Spring MVC Web application.
Run the Empty Web Application
Now you are ready to run your Web application for the first time. Run the BlogMvcApplication class, just like any other Java program. It should show a long sequence of logs (informational messages) at its startup:
![]()
Open project URL at http://localhost:8080 in your browser to check whether Tomcat and Spring MVC are running. You should see a Web page like the shown below. Note the green site icon of the top left angle of the browser. This is the Spring Framework’s icon. If you see it, your browser shows a Spring MVC application.
![]()
It is quite normal to see this error message. It says that the Embedded Tomcat server with Spring MVC is running, but you have no registered controller action to handle HTTP GET requests for your home page URL “/“.
If your browser shows you other Web content (e.g. different site icon), or fails to open localhost:8080, check for errors in your Java application output and also who is listening at port 8080 on your localhost loopback interface.
Create the Home Controller + View
To ensure your Spring MVC application and the Thymeleaf templating engine are properly configured, create your first controller + Thymeleaf view and invoke it from your browser.
Create a Java class HomeController.java in your src/main/java/blog/controllers directory:
|
src/main/java/blog/controllers/HomeController.java
|
package blog.controllers;

import org.springframework.stereotype.Controller;
import org.springframework.web.bind.annotation.RequestMapping;

@Controller
public class HomeController {
@RequestMapping("/")
    public String index() {
        return "index";
    }
}
|
The above code defines a Spring Web MVC controller and defines an action that handles HTTP GET requests for the root URL of the project “/“. When someone opens http://localhost:8080/ form a Web browser, the above action will be called. It returns the “index” view and this means to render a Thymeleaf template “index.html” located in the file src/main/resources/templates/index.html.
Create a Thymeleaf view “index.html” in your src/main/resources/templates directory:
|
src/main/resources/templates/index.html
|
<!DOCTYPE html>
<html xmlns:th="http://www.thymeleaf.org">

<head>
    <meta charset="UTF-8" />
    <title>Blog</title>
</head>

<body>
<h1>Welcome to Spring MVC</h1>
    Now is: <b th:text="${execInfo.now.time}"></b>
</body>

</html>
|
The above code is a sample HTML page that uses the Thymeleaf view engine to display the current date and time. The namespace xmlns:th=“http://www.thymeleaf.org”
indicates that this file is not pure HTML, but is a Thymeleaf template that should be processed at the server side to produce a HTML page.
Restart the Web Server to See the Changes
Compile and make your project (press [Ctrl+F9] in IDEA) and restart the Spring Boot Web server to be able to see the changes in your code (the new controller + view). Stop and start again (or re-run) your Spring MVC application (the BlogMvcApplication class). In IntelliJ IDEA you have a special button to do this in the [Run] panel:
![]()
See the Output from Your First Controller + View
Now refresh your Web browser or open again http://localhost:8080. You should see the HTML output from your first MVC controller action + Thymeleaf view. It should look like this:
![]()
Configure Auto-Reload after Change in the Source Code
It is quite ugly to rebuild your project and restart your Web server manually each time you change the source code in order to see the changes. Let’s automate this process.
First, disable the Thymeleaf template caching in your application.properties settings file:
|
src/main/resources/application.properties
|
spring.thymeleaf.cache = false
|
Second, install Spring Boot Development Tools in your Maven configuration. Just add this dependency:
|
pom.xml
|
<dependency>
    <groupId>org.springframework.boot</groupId>
    <artifactId>spring-boot-devtools</artifactId>
</dependency>
|
Don’t remove the other dependencies when you add this new dependency. Your <dependencies> section in pom.xml should look like this:
![]()
Now rebuild the project and restart the server. You will not need to do this more after changing the project. The Spring Boot server will restart automatically after a project change. Make sure to press [Ctrl+F9] in IntelliJ IDEA when you want to see the changes in the source code or view templates.
Create the Site Layout (Header, Menu, Footer, CSS)
Now, let’s build the site layout (also known as master page template). The site layout includes the parts of the site, which should be shared between all site pages:
- Head section – holds the site <head> section with the CSS and scripts references.
- Site header section – holds the site header and top menu.
- Site footer section – holds the site footer area.
Create a new HTML file “layout.html” in src/main/resources/templates. It will hold the site layout:
|
src/main/resources/templates/layout.html
|
<!DOCTYPE html>
<html xmlns:th=“http://www.thymeleaf.org”><head th:fragment=“site-head”>
<meta charset=“UTF-8” />
<link rel=“stylesheet” href=“../public/css/styles.css” th:href=“@{/css/styles.css}” />
<link rel=“icon” href=“../public/img/favicon.ico” th:href=“@{/img/favicon.ico}” />
<script src=“../public/js/jquery-3.1.0.min.js” th:src=“@{/js/jquery-3.1.0.min.js}”></script>
<script src=“../public/js/blog-scripts.js” th:src=“@{/js/blog-scripts.js}”></script>
<meta th:include=“this :: head” th:remove=“tag”/>
</head><body><header th:fragment=“site-header”>
<a href=“index.html” th:href=“@{/}”><img src="../public/img/site-logo.png" th:src="@{/img/site-logo.png}" /></a>
<a href="index.html" th:href="@{/}">Home</a>
<a href="users/login.html" th:href="@{/users/login}">Login</a>
<a href="users/register.html" th:href="@{/users/register}">Register</a>
<a href="posts/index.html" th:href="@{/posts}">Posts</a>
<a href="posts/create.html" th:href="@{/posts/create}">Create Post</a>
<a href="users/index.html" th:href="@{/users}">Users</a>
<div id="logged-in-info"> <span>Hello, <b>(user)</b></span>
<form method="post" th:action="@{/users/logout}">
<input type="submit" value="Logout"/>
</form>
</div>
</header> <h1>Welcome</h1>
<p>Welcome to the Spring MVC Blog.</p> <footer th:fragment="site-footer">
© Spring MVC Blog System, 2016
</footer></body></html> |
The above file “layout.html” holds several Thymeleaf fragments that will be included in all site pages:
- The “site-head” fragment holds the <head> section. It includes the site CSS, JavaScript code, etc. It appends to the page <head> section the <head> section of the invoking page, e.g. index.html.
- The “site-header” fragment holds the site header: site logo + top navigation links to the other site pages. It also holds the “Logout” form. The header now holds links to all pages, but once the login / logout functionality is implemented, it will show / hide some of the links for anonymous site visitors and for the authenticated users.
- The “site-footer” fragment is very simple. It holds some static text for the site footer.
Note that the links in the above code look like duplicated, because there are two attributes that specify the resource address: href=”…” and th:href=”…”. This is because Thymeleaf uses natural templates. “Natural templates” means that the template is a document as valid as the final result and the view engine syntax doesn’t break the document’s structure. The href value specifies the relative resource location in the system (provided by the Web site designer, e.g. “../public/css/styles.css“). The th:href value specifies the resource runtime location at the Web server (which is relative to the site root, e.g. “/css/styles.css“).
Once you have created the site layout template, it is time to modify the home view “index.html” to use this site layout by including its site-head, site-header and site-footer fragments using the Thymeleaf th:replace attributes as it is shown below:
|
src/main/resources/templates/index.html
|
|
<!DOCTYPE html>
<html xmlns:th=“http://www.thymeleaf.org”>
<head th:replace=“layout :: site-head”>
<title>Welcome to Spring MVC Blog</title>
</head>
<body>
<header th:replace=“layout :: site-header” />
<h1>Welcome to Spring MVC</h1>
Now is: <b th:text=“${execInfo.now.time}”>date and time</b>
<footer th:replace=“layout :: site-footer” />
</body>
</html> |
The concept of “natural templates” is simple: if you open directly in a Web browser the above HTML files (by double-clicking on layout.html or index.html), without rendering them through the Thymeleaf view engine, their HTML content will be displayed correctly and will look meaningful.
Now make the project ([Ctrl+F9] in IntelliJ IDEA) and refresh the browser to see the changes:
![]()
The site header and footer should be shown correctly but look a little bit ugly, because there is no CSS styles. The site browser icon (at the top left corner) is also change (by the favico.ico file in the site header).
Add CSS Styles for the Site Layout
Let’s style the header, footer and the main page content. Add these style definitions in the site CSS file:
|
src/main/resources/public/css/styles.css
|
|
body>header {
background: #eee;
padding: 5px;
}
body>header>a>img, body>header a {
display: inline-block;
vertical-align: middle;
padding: 0px 5px;
font-size: 1.2em;
}
body>footer {
background: #eee;
padding: 5px;
margin: 10px 0;
text-align: center;
}
#logged-in-info {
float: right;
margin-top: 18px;
}
#logged-in-info form {
display: inline-block;
margin-right: 10px;
} |
Now save the changes, make the project and refresh the Web browser to see how the site looks after the styling:
![]()
Congratulations, you have successfully created the site layout (the shared head, header, footer and CSS).
Part II: Build the Application UI (Spring MVC)
In this section we shall build the application user interface (UI) without connecting it to the database. We shall build controllers and views to implement the user interface of the project. Instead of connecting to the database, we shall use stub service implementations that provide sample data for visualization in the view templates.
Create Entity Classes: “User” and “Post”
In order to create the controllers and views of the Blog system, we will need the entity classes (data models) to hold users and posts. Let’s create these classes.
First, create a class User in the package blog.models to hold information about blog users. Users have id, username, passwordHash (encrypted password), fullName and a set of posts:
|
src/main/java/blog/models/User.java
|
|
package blog.models;
import java.util.HashSet;
import java.util.Set;
public class User {
private Long id;
private String username;
private String passwordHash;
private String fullName;
private Set<Post> posts = new HashSet<>();
} |
Now generate getters and setters (for all fields), constructors (empty and by id + username + fullName) and toString() method (don’t print the set of posts in the toString() to avoid endless recursion) in the User class:
![]()
The generated code might look as follows:
|
src/main/java/blog/models/User.java
|
public class User {
…
public Long getId() { return id; }
public void setId(Long id) { this.id = id; }
public String getUsername() { return username; }
public void setUsername(String username) { this.username = username; }
public String getPasswordHash() { return passwordHash; }
public void setPasswordHash(String passHash) { this.passwordHash = passHash; }
public String getFullName() { return fullName; }
public void setFullName(String fullName) { this.fullName = fullName; }
public Set<Post> getPosts() { return posts; }
public void setPosts(Set<Post> posts) { this.posts = posts; }
public User() { }
public User(Long id, String username, String fullName) {
this.id = id; this.username = username; this.fullName = fullName;
}
@Override
public String toString() {
return "User{" + "id=" + id + ", username='" + username + '\'' +
", passwordHash='" + passwordHash + '\'' +
", fullName='" + fullName + '\'' + '}';
}
}
|
Next, create a class Post in the package blog.models to hold information about blog posts. Posts have id, title, body, date of publishing (defaults to the current date and time) and an author (which is User):
|
src/main/java/blog/models/Post.java
|
| package blog.models;
import java.util.Date;
public class Post {
private Long id;
private String title;
private String body;
private User author;
private Date date = new Date();
} |
Generate getters and setters (for all fields), empty constructor, constructors by id + title + body + author and toString() method for the Post class. Your code might look like the shown below (it is intentionally shown as image to avoid copy / paste):
|
src/main/java/blog/models/Post.java
|
|
![]()
|
Create Service Interface “PostService”
In Spring MVC uses a layered architecture: controllers à services à repositories à models à database.
- Controllers – hold the presentation (UI) logic – process user request (GET / POST / other), prepare data for the view and render the view (or redirect to another URL). Example: prepare and show the home page.
- Services – hold the business logic. Often just call some repository method. Example: create new post / show a post for deleting / delete post. Services may have several implementations: DB based or stub based.
- Repositories – implement the database CRUD operations (create / read / edit / delete) in the database for certain entity class (model). Examples: find post by id / delete post by id. Often provided by the framework (not written by hand).
- Models (entity classes) – holds the data about the application data. Examples: user, post, tag, …
Now, create the service interface that will provide the business logic for working with posts in the blog system:
|
src/main/java/blog/services/PostService.java
|
package blog.services;
import blog.models.Post;
import java.util.List;
public interface PostService {
List<Post> findAll();
List<Post> findLatest5();
Post findById(Long id);
Post create(Post post);
Post edit(Post post);
void deleteById(Long id);
}
|
The PostService interface provides all the functionality about posts that is needed for the blog system.
Create Stub Service Implementation “PostServiceStubImpl”
To reduce the complexity, the blog application will be created step by step. First, the blog will be implemented to work without a database: users and posts will be stored in the server memory. Later, the database persistence will be implemented to replace the in-memory object storing.
Let’s implement a stub (sample data, stored in the memory) for the PostService. It will be a Java class called PostServiceStubImpl. It will hold the posts in a List<Post> collection and the service methods will be easy to be implemented:
|
src/main/java/blog/services/PostServiceStubImpl.java
|
package blog.services;
import blog.models.Post;
import blog.models.User;
import org.springframework.stereotype.Service;
import java.util.*;
import java.util.stream.Collectors;
@Service
public class PostServiceStubImpl implements PostService {
private List<Post> posts = new ArrayList<Post>() {{
add(new Post(1L, "First Post", "<p>Line #1.</p><p>Line #2</p>", null));
add(new Post(2L, "Second Post",
"Second post content:<ul><li>line 1</li><li>line 2</li></p>",
new User(10L, "pesho10", "Peter Ivanov")));
add(new Post(3L, "Post #3", "<p>The post number 3 nice</p>",
new User(10L, "merry", null)));
add(new Post(4L, "Forth Post", "<p>Not interesting post</p>", null));
add(new Post(5L, "Post Number 5", "<p>Just posting</p>", null));
add(new Post(6L, "Sixth Post", "<p>Another interesting post</p>", null));
}};
@Override
public List<Post> findAll() {
return this.posts;
}
@Override
public List<Post> findLatest5() {
return this.posts.stream()
.sorted((a, b) -> b.getDate().compareTo(a.getDate()))
.limit(5)
.collect(Collectors.toList());
}
@Override
public Post findById(Long id) {
return this.posts.stream()
.filter(p -> Objects.equals(p.getId(), id))
.findFirst()
.orElse(null);
}
@Override
public Post create(Post post) {
post.setId(this.posts.stream().mapToLong(
p -> p.getId()).max().getAsLong() + 1);
this.posts.add(post);
return post;
}
@Override
public Post edit(Post post) {
for (int i = 0; i < this.posts.size(); i++) {
if (Objects.equals(this.posts.get(i).getId(), post.getId())) {
this.posts.set(i, post);
return post;
}
}
throw new RuntimeException("Post not found: " + post.getId());
}
@Override
public void deleteById(Long id) {
for (int i = 0; i < this.posts.size(); i++) {
if (Objects.equals(this.posts.get(i).getId(), id)) {
this.posts.remove(i);
return;
}
}
throw new RuntimeException("Post not found: " + id);
}
}
|
The above service implementation is just for testing. It will allow us to develop the application frond-end UI (controllers and views) without carrying about the complexity of the database access. It will also make the application services testable without the need of database. Let’s update the home page controller.
Note: the annotation @Service for the service implementation class is important here. It tells the Spring Framework that this class will be used by the application controllers as a service and Spring Framework will automatically instantiate and inject it in the controllers (through the @Autowired annotation).
Invoke the “PostService” from the Home Page Controller
Now, let’s update the home page controller to use the PostService and its testing stub implementation PostServiceStubImpl. Now the HomeController.index() method should prepare for the view the latest 3 blog posts (to be shown at the home page) + the latest 5 blog posts (to be shown at the sidebar).
|
src/main/java/blog/controllers/HomeController.java
|
|
@Controller
public class HomeController {
@Autowired
private PostService postService;
@RequestMapping(“/”)
public String index(Model model) {
List<Post> latest5Posts = postService.findLatest5();
model.addAttribute(“latest5posts”, latest5Posts);
List<Post> latest3Posts = latest5Posts.stream()
.limit(3).collect(Collectors.toList());
model.addAttribute(“latest3posts”, latest3Posts);
return “index”;
}
}
|
Note the @Autowired annotation before the postService field. This is the
“magic” of Spring Framework. It automatically injects the correct implementation for your services at the places where they are needed. Developers just type “@Autowired“. Spring scans the project and finds all classes that implement the service interface. If only one such class is found, it is instantiated and its instance is auto-wired (injected) in the field or method parameter where it is requested.
The above controller action puts in the view model the latest 5 posts as object named “latest5posts” and the latest 3 posts as object named “latest3posts” to be shown at the home page by the view. Now it is time to write the home page view to process these posts.
Implement “List Latest 3 Posts” at the Home Page Main Area
Let’s modify the home page view to display the latest 3 posts:
|
src/main/resources/templates/index.html
|
<!DOCTYPE html>
<html xmlns:th="http://www.thymeleaf.org">
<head th:replace="layout :: site-head">
<title>Spring MVC Blog</title>
</head>
<body>
<header th:replace="layout :: site-header" />
<main id="posts">
<article th:each="p : ${latest3posts}">
<h2 class="title" th:text="${p.title}">Post Title</h2>
<div class="date">
<i>Posted on</i>
<span th:text="${#dates.format(p.date, 'dd-MMM-yyyy')}">22-May-2016</span>
<span th:if="${p.author}" th:remove="tag">
<i>by</i>
<span th:text="${p.author.fullName != null ?
p.author.fullName : p.author.username}">Svetlin Nakov</span>
</span>
</div>
<p class="content" th:utext="${p.body}">Post content</p>
</article>
</main>
<footer th:replace="layout :: site-footer" />
</body>
</html>
|
The view iterates over the “latest3posts” collection and for each post in it shows the post details: title, date (in format dd-MMM-yyyy, e.g. 22-May-2016), author (when available, print its full name or just its username when the full name is missing) and post body.
Make the project and open the home page from your Web browser. It should look like this:
![]()
Implement the “List latest 5 Posts” at the Home Page Sidebar
Now implement the sidebar at the home page that holds the titles of the last 5 posts in hyperlinks to these posts. Add the following code just after the header in the index.html home page template:
|
src/main/resources/templates/index.html
|
|
<aside>
<h2>Recent Posts</h2>
<a href=“#” th:each=“p : ${latest5posts}” th:text=“${p.title}” th:href=“@{/posts/view/{id}/(id=${p.id})}”>Work Begins on HTML5.1</a>
</aside>
|
Now test the application. It should display 5 links at the home page, just after the page header:
![]()
Now add some CSS styles to make these links display correctly at the sidebar on the right side
of the home page. Append the following code in your styles.css file:
|
src/main/resources/public/css/styles.css
|
body>aside {
float: right;
width: 200px;
background: #CCC;
padding: 15px;
margin-left: 20px;
margin-top: 10px;
}
body>aside h2 {
margin: 5px 0px 15px 0px;
}
body>aside a {
display: block;
margin: 5px 0px;
text-decoration: none;
}
body>main:after {
content: '';
display: block;
clear: both;
}
|
Now the sidebar looks better:
![]()
Create the “Post Details” Page
Now create the “Post Details” page, which will display a single post by id. It will be invoked when user clicks on the links in the Sidebar. It will be mapped to URL /posts/view/{id}/, e.g. http://localhost:8080/posts/view/3/.
Create “Post Details” Action in PostsController
Create the PostsController and its action view(id):
|
src/main/java/blog/controllers/PostsController.java
|
@Controller
public class PostsController {
@Autowired
private PostService postService;
@RequestMapping("/posts/view/{id}")
public String view(@PathVariable("id") Long id, Model model) {
Post post = postService.findById(id);
model.addAttribute("post", post);
return "posts/view";
}
}
|
The PostsController works like the HomeController. It handles URLs like /posts/view/{id}/ and finds the requested post using the @Autowired implementation of the PostService and renders the view “posts/view“, which corresponds to the file “view.html” in directory src/main/resources/templates/posts. For cleaner organization, all post-related views are placed in a subdirectory “posts” under “templates“.
Create “Post Details” View
Create the posts/view.html template (view) to display the post loaded by the PostsController:
|
src/main/resources/templates/posts/view.html
|
<!DOCTYPE html>
<html xmlns:th="http://www.thymeleaf.org">
<head th:replace="layout :: site-head">
<title th:text="${post.title}">View Post</title>
</head>
<body>
<header th:replace="layout :: site-header" />
<main id="posts">
<article>
<h2 class="title" th:text="${post.title}">Post Title</h2>
<div class="date">
<i>Posted on</i>
<span th:text="${#dates.format(post.date, 'dd-MMM-yyyy')}">22-May-2016</span>
<span th:if="${post.author}" th:remove="tag">
<i>by</i>
<span th:text="${post.author.fullName != null ?
post.author.fullName : post.author.username}">Svetlin Nakov</span>
</span>
</div>
<p class="content" th:utext="${post.body}">Post content</p>
</article>
</main>
<footer th:replace="layout :: site-footer" />
</body>
</html>
|
The view “posts/view.html” works exactly like the home view “index.html“. It shows the post details: title, formatted date, author (when available, print its full name or username when the full name is missing) and post body. Like any other view, it re-uses the “head“, “site-header” and “site-footer” fragments from “layout.html“. Additionally, it changes the page title to hold the post title.
Test the “Post Details” View
Run the project (just recompile it and refresh the browser) to see how the new page works:
![]()
Test the “Post Details” View for Invalid Post
Looks good, but what will happen, if a wrong post is open, e.g. /posts/view/150? Let’s see:
![]()
It would be better if the application says something like “Sorry, the post #150 is not found” in a good-looking form. You might change the error page following the Spring Boot documentation: http://docs.spring.io/spring-boot/docs/current/reference/htmlsingle/#boot-features-error-handling-custom-error-pages.
Implement Notifications System
Let’s implement a “notification system” that allows us to display success / error
messages, like these:
![]()
![]()
![]()
A good approach is to create a NotificationService, which will encapsulate the logic related to adding and storing the info / error messages + add some code in the site layout template to show the messages (when available). Let’s create a notification service, implementation of this service and notifications view template.
Notification Service Interface
Create a new Java interface called “NotificationService.java” in src/main/java/blog/services:
|
src/main/java/blog/services/NotificationService.java
|
package blog.services;
public interface NotificationService {
void addInfoMessage(String msg);
void addErrorMessage(String msg);
}
|
This service interface provides methods for adding error and information messages for displaying later in the view.
Notification Service Implementation
Implement the NotificationService interface in a new Java class called NotificationServiceImpl. It stores the info and error messages in a List<NotificationMessage> in the HTTP session. The HTTP session is a special place where you can store objects (key à value) and they persist for long time. HTTP session objects survive request redirections and may be accessed long time later after they are created. The notification messages will be displayed later in the site header (in layout.html). To implement the notification service, just create the class:
|
src/main/java/blog/services/NotificationServiceImpl.java
|
package blog.services;
import org.springframework.beans.factory.annotation.Autowired;
import org.springframework.stereotype.Service;
import javax.servlet.http.HttpSession;
import java.util.ArrayList;
import java.util.List;
@Service()
public class NotificationServiceImpl implements NotificationService {
public static final String NOTIFY_MSG_SESSION_KEY = "siteNotificationMessages";
@Autowired
private HttpSession httpSession;
@Override
public void addInfoMessage(String msg) {
addNotificationMessage(NotificationMessageType.INFO, msg);
}
@Override
public void addErrorMessage(String msg) {
addNotificationMessage(NotificationMessageType.ERROR, msg);
}
private void addNotificationMessage(NotificationMessageType type, String msg) {
List<NotificationMessage> notifyMessages = (List<NotificationMessage>)
httpSession.getAttribute(NOTIFY_MSG_SESSION_KEY);
if (notifyMessages == null) {
notifyMessages = new ArrayList<NotificationMessage>();
}
notifyMessages.add(new NotificationMessage(type, msg));
httpSession.setAttribute(NOTIFY_MSG_SESSION_KEY, notifyMessages);
}
public enum NotificationMessageType {
INFO,
ERROR
}
public class NotificationMessage {
NotificationMessageType type;
String text;
public NotificationMessage(NotificationMessageType type, String text) {
this.type = type;
this.text = text;
}
public NotificationMessageType getType() {
return type;
}
public String getText() {
return text;
}
}
}
|
Modify the Layout View Template to Show Notifications
Now the messages are available in the HTTP session. It is time to display them after the site header and remove them from the session (after they have been successfully shown to the user). Replace the “site-header” fragment in the layout view “layout.html” with the following:
|
src/main/resources/templates/layout.html
|
…
<header th:fragment="site-header" th:remove="tag">
<header>
<a href="index.html" th:href="@{/}"><img
src="../public/img/site-logo.png" th:src="@{/img/site-logo.png}" /></a>

  <a href="index.html" th:href="@{/}">Home</a>

  <a href="users/login.html" th:href="@{/users/login}">Login</a>

  <a href="users/register.html" th:href="@{/users/register}">Register</a>

  <a href="posts/index.html" th:href="@{/posts}">Posts</a>

  <a href="posts/create.html" th:href="@{/posts/create}">Create Post</a>

  <a href="users/index.html" th:href="@{/users}">Users</a>

  <div id="logged-in-info"> <span>Hello, <b>(user)</b></span>

    <form method="post" th:action="@{/users/logout}">

      <input type="submit" value="Logout"/>

    </form>

  </div>

 </header>
<ul id="messages" th:with="notifyMessages=${session[T(blog.services
.NotificationServiceImpl).NOTIFY_MSG_SESSION_KEY]}">
<li th:each="msg : ${notifyMessages}" th:text="${msg.text}"
th:class="${#strings.toLowerCase(msg.type)}">
</li>
<span th:if="${notifyMessages}" th:remove="all" th:text="${session.remove(
          T(blog.services.NotificationServiceImpl).NOTIFY_MSG_SESSION_KEY)}"></span>

    </ul>
</header>
…
|
The above code first replaces the site header with two elements:
- The original <header> element which holds the site logo and top navigation.
- A new element <ul id=”messages”> to hold the notification messages
The code to show the notification messages is complex to be explained, but in brief: it iterates over the list of notification messages, displays each message in a <li> and finally removes all messages from the HTTP session.
Modify the PostsController to Add Error Messages
Now add an error message notification in the PostsController, when an invalid post id is requested:
|
src/main/java/blog/controllers/PostsController.java
|
@Controller
public class PostsController {
        @Autowired
        private PostService postService;

        @Autowired
        private NotificationService notifyService;

        @RequestMapping("/posts/view/{id}")
        public String view(@PathVariable("id") Long id, Model model) {
            Post post = postService.findById(id);
            if (post == null) {
                notifyService.addErrorMessage("Cannot find post #" + id);
                return "redirect:/";
            }
            model.addAttribute("post", post);
            return "posts/view";
        }
}
|
The above code first injects the notification service by “@Autowired” annotation. It adds a check in the view(id) action and in case of invalid post id, it adds an error message though the notification service and redirects to the home page, where this message well be shown.
Add CSS Styles for the Notification Messages
|
src/main/resources/public/css/styles.css
|
|
ul#messages li {
display: block;
width: 80%;
margin: 5px auto;
text-align: center;
padding: 5px;
border-radius: 5px;
}
ul#messages li.info {
background: #7f7;
}
ul#messages li.error {
background: #d00;
color: white;
} |
Test the Notification Messages
To test the notification messages, open an invalid post, e.g. http://localhost:8080/posts/view/12345. The result should be like this:
![]()
Add JavaScript to Animate the Notification Messages
Now, let’s make the notification messages more fancy. Add JavaScript code that will hide automatically all notification messages after 3 seconds and will hide all notification messages on mouse click. Add the following code in the main file, holding the site JavaScript code “blog-scripts.js“:
|
src/main/resources/public/js/blog-scripts.js
|
$(function() {
    $('#messages li').click(function() {
        $(this).fadeOut();
    });
    setTimeout(function() {
        $('#messages li.info').fadeOut();
    }, 3000);
});
|
The above JS code is loaded by the layout template (in the “site-head” fragment), just after the jQuery library and the function in it is executed when the page is completely loaded. The code finds all <li class=”message”> elements with jQuery and attaches event handlers to hide them (with pleasant fade-out effect) on mouse click or at 3000 milliseconds timeout (for .info messages).
Create the “Login” Page
Forms are a bit more complicated. Let’s create the login page and its functionality.
Create LoginForm Model Class
First, create the login form model. It holds the validation rules for the form fields:
|
src/main/java/blog/forms/LoginForm.java
|
package blog.forms;

import javax.validation.constraints.NotNull;
import javax.validation.constraints.Size;

public class LoginForm {
    @Size(min=2, max=30, message = "Username size should be in the range [2...30]")
    private String username;

    @NotNull
    @Size(min=1, max=50)
    private String password;

    public String getUsername() {
        return username;
    }

    public void setUsername(String username) {
        this.username = username;
    }

    public String getPassword() {
        return password;
    }

    public void setPassword(String password) {
        this.password = password;
    }
}
|
Create UserService
Next, create the user service interface that implements the login authentication functionality:
|
src/main/java/blog/services/UserService.java
|
package blog.services;

public interface UserService {
    boolean authenticate(String username, String password);
}
|
Create UserServiceStubImpl
Next, create the user service stub implementation (we shall have real implementation later):
|
src/main/java/blog/services/UserServiceStubImpl.java
|
package blog.services;

import org.springframework.stereotype.Service;

import java.util.Objects;

@Service
public class UserServiceStubImpl implements UserService {
    @Override
    public boolean authenticate(String username, String password) {
         // Provide a sample password check: username == password
         return Objects.equals(username, password);
    }
}
|
Create the LoginController
Next, create the login controller:
|
src/main/java/blog/controllers/LoginController.java
|
package blog.controllers;

import blog.forms.LoginForm;
import blog.services.NotificationService;
import blog.services.UserService;
import org.springframework.beans.factory.annotation.Autowired;
import org.springframework.stereotype.Controller;
import org.springframework.validation.BindingResult;
import org.springframework.web.bind.annotation.RequestMapping;
import org.springframework.web.bind.annotation.RequestMethod;

import javax.validation.Valid;

@Controller
public class LoginController {

    @Autowired
    private UserService userService;

    @Autowired
    private NotificationService notifyService;

    @RequestMapping("/users/login")
    public String login(LoginForm loginForm) {
        return "users/login";
    }

    @RequestMapping(value = "/users/login", method = RequestMethod.POST)
    public String loginPage(@Valid LoginForm loginForm, BindingResult bindingResult) {
        if (bindingResult.hasErrors()) {
             notifyService.addErrorMessage("Please fill the form correctly!");
             return "users/login";
        }

        if (!userService.authenticate(
             loginForm.getUsername(), loginForm.getPassword())) {
             notifyService.addErrorMessage("Invalid login!");
             return "users/login";
        }

        notifyService.addInfoMessage("Login successful");
        return "redirect:/";
    }
}
|
Create the Login View
Finally, create the login view:
|
src/main/resources/templates/users/login.html
|
<!DOCTYPE html>
<html xmlns:th="http://www.thymeleaf.org">

<head th:replace="layout :: site-head">
  <title>Login</title>
</head>

<body>

<header th:replace="layout :: site-header" />

<h1>Login in the Blog</h1>

<form method="post" th:object="${loginForm}">
  <div><label for="username">Username:</label></div>
  <input id="username" type="text" name="username" th:value="*{username}" />
  <span class="formError" th:if="${#fields.hasErrors('username')}"
                                th:errors="*{username}">Invalid username</span>

  <div><label for="password" th:value="*{username}">Password:</label></div>
  <input id="password" type="password" name="password" th:value="*{password}" />
  <span class="formError" th:if="${#fields.hasErrors('password')}"
                                th:errors="*{password}">Invalid password</span>

  <div><input type="submit" value="Login"/>
  <a href="register.html" th:href="@{/users/register}">[Go to Register]</a></div>
</form>

<footer th:replace="layout :: site-footer" />

</body>

</html>
|
Add CSS for the Form Validation
Add some CSS for the form validation:
|
src/main/resources/public/css/styles.css
|
.formError {
    color: red;
    font-style: italic;
}
|
Test the Login Form Functionality
Now run the login form and test it:
![]()
![]()
![]()
Create the “User Registration” Page
Create the page like the previous one. It is very similar.
The next few steps are still unfinished, so you could implement them yourself.
Create the “List Posts” Page
Create the “Create New Post” Page
Create the “Delete Post” Page
Create the “Edit Existing Post” Page
Create the “List Users” Page
Part III: Connect the Application to the DB (Spring Data JPA)
In this section we shall connect the application to the database and implement data access logic with Spring Data JPA, JPA, Hibernate and MySQL.
Add Spring Data Maven Dependencies
Add Spring Data JPA and MySQL dependencies in the Maven project settings:
|
pom.xml
|
|
<dependency>
<groupId>org.springframework.data</groupId>
<artifactId>spring-data-jpa</artifactId>
</dependency>
<dependency>
<groupId>org.springframework.boot</groupId>
<artifactId>spring-boot-starter-data-jpa</artifactId>
</dependency>
<dependency>
<groupId>mysql</groupId>
<artifactId>mysql-connector-java</artifactId>
<version>6.0.3</version>
</dependency> |
Define MySQL Connection Settings (application.properties)
Define the JPA settings to connect to your MySQL database. Ensure your MySQL server is running and the database “blog_db” exists inside it. Use the following database configuration settings:
|
src/main/resources/application.properties
|
|
spring.thymeleaf.cache = false
spring.datasource.driver-class-name = com.mysql.cj.jdbc.Driver
spring.datasource.url = jdbc:mysql://localhost/blog_db?characterEncoding=utf8
spring.datasource.username = root
spring.datasource.password =
# Configure Hibernate DDL mode: create / update
spring.jpa.properties.hibernate.hbm2ddl.auto = create
# Disable the default loggers
#logging.level.org = WARN
#logging.level.blog = WARN
### Show SQL executed with parameter bindings
#logging.level.org.hibernate.SQL = DEBUG
#logging.level.org.hibernate.type.descriptor = TRACE
#spring.jpa.properties.hibernate.format_sql = TRUE |
Annotate the Entity Classes: User and Post
Put JPA annotations (table and column mappings + relationship mappings) to the entity classes in order to make then ready for persistence in the database through the JPA / Hibernate technology. Start with the User class:
|
src/main/java/blog/models/User.java
|
|
package blog.models;
import javax.persistence.*;
import java.util.HashSet;
import java.util.Set;
@Entity
@Table(name = “users”)
public class User {
@Id
@GeneratedValue(strategy = GenerationType.IDENTITY)
private Long id;
@Column(nullable = false, length = 30, unique = true)
private String username;
@Column(length = 60)
private String passwordHash;
@Column(length = 100)
private String fullName;
@OneToMany(mappedBy = “author”)
private Set<Post> posts = new HashSet<Post>();
public Long getId() {
return id;
}
public void setId(Long id) {
this.id = id;
}
public String getUsername() {
return username;
}
public void setUsername(String username) {
this.username = username;
}
public String getPasswordHash() {
return passwordHash;
}
public void setPasswordHash(String passwordHash) {
this.passwordHash = passwordHash;
}
public String getFullName() {
return fullName;
}
public void setFullName(String fullName) {
this.fullName = fullName;
}
public Set<Post> getPosts() {
return posts;
}
public void setPosts(Set<Post> posts) {
this.posts = posts;
}
public User() {
}
public User(String username, String fullName) {
this.username = username;
this.fullName = fullName;
}
public User(Long id, String username, String fullName) {
this.id = id;
this.username = username;
this.fullName = fullName;
}
@Override
public String toString() {
return “User{” +
“id=” + id +
“, username='” + username + ‘\’‘ +
“, passwordHash='” + passwordHash + ‘\’‘ +
“, fullName='” + fullName + ‘\’‘ +
‘}’;
}
} |
Annotate in the same way the Post class:
|
src/main/java/blog/models/Post.java
|
package blog.models;

import javax.persistence.*;
import java.util.Date;

@Entity
@Table(name = "posts")
public class Post {
    @Id
    @GeneratedValue(strategy = GenerationType.IDENTITY)
    private Long id;

    @Column(nullable = false, length = 300)
    private String title;

    @Lob @Column(nullable = false)
    private String body;

    @ManyToOne(optional = false, fetch = FetchType.LAZY)
    private User author;

    @Column(nullable = false)
    private Date date = new Date();

    public Long getId() {
         return id;
    }

    public void setId(Long id) {
         this.id = id;
    }

    public String getTitle() {
         return title;
    }

    public void setTitle(String title) {
         this.title = title;
    }

    public String getBody() {
         return body;
    }

    public void setBody(String body) {
         this.body = body;
    }

    public User getAuthor() {
         return author;
    }

    public void setAuthor(User author) {
         this.author = author;
    }

    public Date getDate() {
         return date;
    }

    public void setDate(Date date) {
         this.date = date;
    }

     public Post() {}

     public Post(Long id, String title, String body, User author) {
          this.id = id;
          this.title = title;
          this.body = body;
          this.author = author;
    }

     @Override
     public String toString() {
         return "Post{" +
            "id=" + id +
            ", title='" + title + '\'' +
            ", body='" + body + '\'' +
            ", author=" + author +
            ", date=" + date +
            '}';
    }
}
|
Create UserRepository and PostRepository (Spring Data JPA)
Create the interface UserRepository. Note that you will not provide any implementation for it. Spring Data JPA will implement it for you. This is part of the “magic” behind the “Spring Data” framework:
|
src/main/java/blog/repositories/UserReposiory.java
|
|
package blog.repositories;
import blog.models.User;
import org.springframework.data.jpa.repository.JpaRepository;
import org.springframework.stereotype.Repository;
@Repository
public interface UserRepository extends JpaRepository<User, Long> {
} |
Create the interface PostRepository in similar way. Don’t implement this interface. Spring Data will create an implementation of it. This is the “magic” of the @Repository annotation.
|
src/main/java/blog/repositories/PostReposiory.java
|
|
package blog.repositories;
import blog.models.Post;
import org.springframework.data.domain.Pageable;
import org.springframework.data.jpa.repository.JpaRepository;
import org.springframework.data.jpa.repository.Query;
import org.springframework.stereotype.Repository;
import java.util.List;
@Repository
public interface PostRepository extends JpaRepository<Post, Long> {
@Query(“SELECT p FROM Post p LEFT JOIN FETCH p.author ORDER BY p.date DESC”)
List<Post> findLatest5Posts(Pageable pageable);
} |
Not that the above JPQL query will be automatically implemented and mapped to the method findLatest5Posts() in the service implementation provided by Spring Data.
Implement the PostService and UserService to Use the DB
Just add new implementations for the UserService and PostService, annotated with @Primary. This will tell the Spring Framework to use these implementations instead of the old stubs.
|
src/main/java/blog/services/PostServiceJpaImpl.java
|
|
package blog.services;
import blog.models.Post;
import blog.repositories.PostRepository;
import org.springframework.beans.factory.annotation.Autowired;
import org.springframework.context.annotation.Primary;
import org.springframework.data.domain.PageRequest;
import org.springframework.stereotype.Service;
import java.util.List;
@Service
@Primary
public class PostServiceJpaImpl implements PostService {
@Autowired
private PostRepository postRepo;
@Override
public List<Post> findAll() {
return this.postRepo.findAll();
}
@Override
public List<Post> findLatest5() {
return this.postRepo.findLatest5Posts(new PageRequest(0, 5));
}
@Override
public Post findById(Long id) {
return this.postRepo.findOne(id);
}
@Override
public Post create(Post post) {
return this.postRepo.save(post);
}
@Override
public Post edit(Post post) {
return this.postRepo.save(post);
}
@Override
public void deleteById(Long id) {
this.postRepo.delete(id);
}
} |
The UserService and its implementation are similar to PostService and its implementation.
|
src/main/java/blog/services/UserService.java
|
|
package blog.services;
import blog.models.User;
import java.util.List;
public interface UserService {
List<User> findAll();
User findById(Long id);
User create(User user);
User edit(User user);
void deleteById(Long id);
} |
The UserServiceJpaImpl class just invokes the repository methods to do its job. It is annotated with the @Service and @Primary annotations to tell the Spring Framework to make it available for @Autowire injection in the controllers:
|
src/main/java/blog/services/UserServiceJpaImpl.java
|
|
package blog.services;
import blog.models.User;
import blog.repositories.UserRepository;
import org.springframework.beans.factory.annotation.Autowired;
import org.springframework.context.annotation.Primary;
import org.springframework.stereotype.Service;
import java.util.List;
@Service
@Primary
public class UserServiceJpaImpl implements UserService {
@Autowired
private UserRepository userRepo;
@Override
public List<User> findAll() {
return this.userRepo.findAll();
}
@Override
public User findById(Long id) {
return this.userRepo.findOne(id);
}
@Override
public User create(User user) {
return this.userRepo.save(user);
}
@Override
public User edit(User user) {
return this.userRepo.save(user);
}
@Override
public void deleteById(Long id) {
this.userRepo.delete(id);
}
} |
Create the Database with hbm2ddl.auto
Ensure the hbm2ddl is enabled (value “create“). This will drop the database at application startup and will re-create the database tables according to the entity classes found in the project.
|
src/main/resources/application.properties
|
|
# Configure Hibernate DDL mode: create / update
spring.jpa.properties.hibernate.hbm2ddl.auto = create
|
Build and run the project. Ensure all tables are created in the MySQL. Use MySQL Workbench or other MySQL database administration tool to see the table structures:
![]()
The database will be empty: no users, no posts.
After that disable auto-table creation:
|
src/main/resources/application.properties
|
|
# Configure Hibernate DDL mode: create / update
spring.jpa.properties.hibernate.hbm2ddl.auto = update
|
Run the project again. You are ready to fill some sample data in the database.
Create Some Sample Data in MySQL (Users and Posts)
Put some data in the MySQL tables. Otherwise the home page will be empty (no blog posts).
You may use the database script from the resources coming with this lab. To insert some users and posts, execute the script db/Sample-data-users-posts.sql:
![]()
Check your database tables users and posts:
![]()
![]()
Test the Sample Users and Posts Data from MySQL
Run the application again to test the sample data:
![]()
Part IV: User Accounts with Spring Security
In this section we shall implement user accounts and access permissions, based on the Spring Security framework. This includes user registration, user login, user logout, authentication, authorization, access control, etc.
Sorry, this part of the tutorial is still unfinished. А lot of work will come here for the login / logout to be implemented using the Spring Security framework. You might check this article as reference: https://spring.io/guides/gs/securing-web/.
Download the source code of the project up to this step (still unifinished): Spring-MVC-Blog-unfinished.zip.
Enjoy!
 Софтуерният университет (СофтУни) започва обучения на деца (3-10 клас). Организираме работилница по компютърни игри за начинаещи. Целта е да развиваме практически умения за програмиране в ученици от 3 до 10 клас, по начин, по който те учат без усилие: чрез игри.


 Днес ще разкажа подробно за професията “Java Developer” и как се става Java програмист, с какви езици за програмиране и софтуерни технологии работят Java и Java EE разработчиците на софтуер и как можем да се научим на Java програмиране и Java Enterprise разработка, от къде да стартираме и какво да учим, стъпка по стъпка.
 Днес ще разкажа подробно за професията “JavaScript Developer” и как се става JS програмист, с какви езици и софтуерни технологии работят JavaScript front-end, JS back-end и full-stack JS разработчиците на софтуер и как можем да се научим на JavaScript програмиране, JavaScript уеб фронт-енд разработка и JavaScript server-side разработка, от къде да стартираме и какво да учим, стъпка по стъпка.
 Днес ще разкажа подробно за професията “PHP Web Developer” и как се става PHP програмист, с какви софтуерни технологии работят PHP разработчиците и как можем да се научим на PHP уеб разработка, съвременни уеб технологии, работа с бази данни и PHP frameworks, от къде да стартираме и какво да учим, стъпка по стъпка. По-конкретно ще обясня за: